What's New - Rimo3 Cloud Danube
September 2023
In the latest release of the Rimo3 Cloud platform we have introduced an updated experience for onboarding applications, and a fresh new interface that gives you more control over the onboarding process.
Previously, when you imported applications they were automatically onboard and tested. While this gave you a touch free process to rapidly get results it also meant that you weren’t fully in control of the onboarding process. With the new onboarding process you still have that automated, touch free option, but you also now have the ability to manage your apps through the onboarding process with greater control, evaluating results at each stage of the process and determining which apps to progress and when.
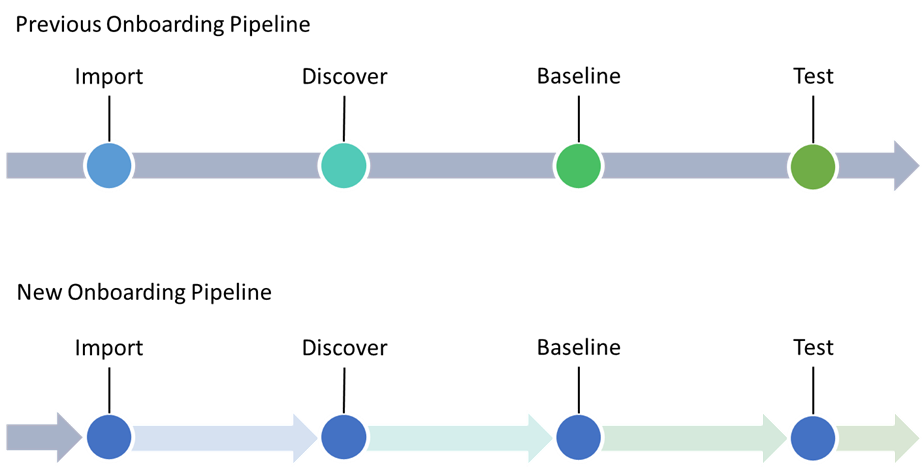
Onboarding Applications#
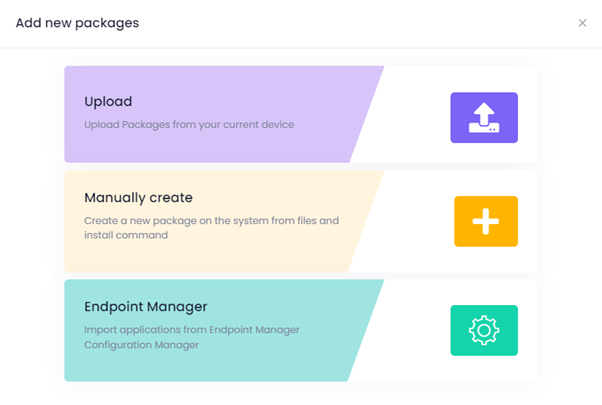
Upload, Manual Add & Import from SCCM#
Applications can be onboarded via any of the existing methods by clicking on the Onboard button, which is available on the Total, Import, Discovery, and Baseline tabs.

This will open the familiar Onboarding Wizard from where you can choose how you want to onboard applications.
Once you have selected the desired method you will now be presented with a new step, where you can choose what onboarding actions you want to complete for the new packages. The available actions are cumulative, meaning that all actions above a particular action are required, e.g. if you select to Baseline the imported applications then Discovery will automatically be selected because it needs to happen first, conversely if you deselect Discovery then Baseline will also be deselected as it cannot happen until Discovery has been completed. It is worth noting however that just because a particular action is selected it doesn’t mean that all imported packages will reach that stage. For example, if you select Baseline then all successfully imported packages will be automatically discovered, but only applications that complete discovery successfully, and are found to have testable shortcuts, will be automatically progressed to Baseline.
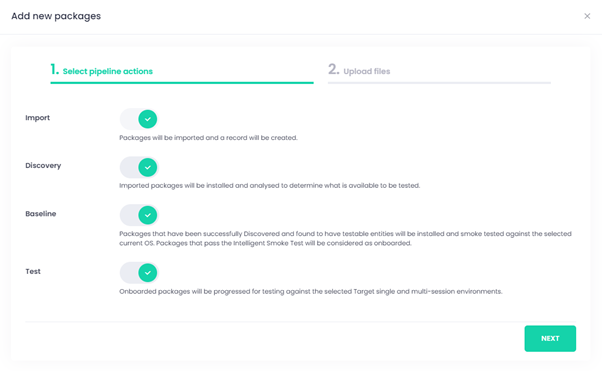
The selectable pipeline actions are:
- Import – This is required and cannot be deselected. All packages that are found will be imported and a record will be created. This gives you the opportunity to review what was imported and decide which applications you want to progress to the next stage.
- Discovery – When selected Imported applications will be installed and analysed to determine what is available to be tested. If you only progress applications to this point you will be able to review and analyse the results, and where necessary rediscover packages before progressing them to the next stage when you are ready.
- Baseline – When selected packages that have been discovered and found to have testable shortcuts will be installed and tested against the Current OS. Packages that pass the intelligent Smoke Test will be considered as onboarded meaning that they can be tested against the target environments. Again, you will be able to review and analyse failures at th his point and, if necessary, rebase packages, before choosing which packages to progress to the next stage.
- Test – When selected any packages that are onboarded will start the testing pipeline which will test them against the Target OS and AVD OS in both single and multi-session scenarios.
Configuring the default pipeline behaviour#
When onboarding applications all pipeline actions are selected by default, i.e. all successfully imported applications will be automatically progressed to testing if possible, assuming they completed Discovery and Baselining and are successfully onboarded. You can, however, configure the default selection for each onboarding method, so imported packages are only progressed as far as you wish by default.
- Under Advanced – General Settings select Configuration Property and filter for ImportSettings
- You can choose which onboarding method to configure:
- Upload
- Manual Add
- SCCM
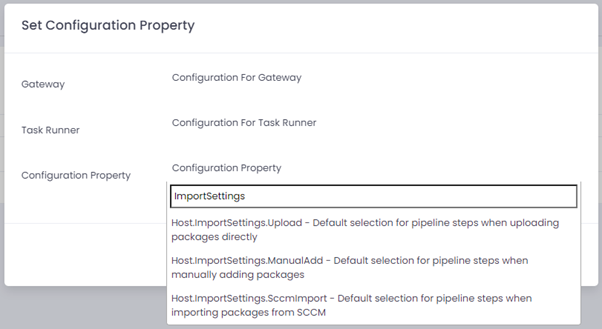
For each method you can then choose how far to progress imported packages. For example:
- You might be happy for Manually Added application to go all the way to Test by default, you can therefore leave this setting unconfigured, because Test is the default behaviour, or explicitly set the ManualAdd property to Test.
- You may also be happy for uploaded packages to be automatically discovered, in which case you would configure the Upload setting to Discovery.
- But you will likely want to review what gets imported from SCCM before starting Discovery, to avoid automatically progressing packages that you have no interest in testing. For the SccmImport setting you would therefore only select Import.
Modernizing Applications#
The existing Modernization wizard remains unchanged and can be invoked from the Modernization tab by clicking on the Modernize button:

Modernized packages will still automatically be onboarded and tested as they are done today.
The Onboarding Dashboard#
The updated process starts on the new Onboarding Dashboard which has been redesigned with a fresh new look which guides you through the updated onboarding process. The interface now includes tabs showing which applications are at each stage of the onboarding process as well as tabs showing Modernized applications and the Total number of applications in the tenant. Each tab includes further filters that are relevant to the selected stage on the onboarding process. The Total tab
The Total tab includes all application in the platform that have either been Imported - via upload, from SCCM, or manually added – or that have been Modernized to a new package format in the platform. For example, if you import 100 applications from SCCM and convert 80 of them to MSIX you will have 180 applications in the platform; the 100 imported packages in their original package format and 80 MSIX packages created in the Rimo3 Platform. The filters allow you to easily view just the imported or Modernized apps on the dashboard.
The Import tab#
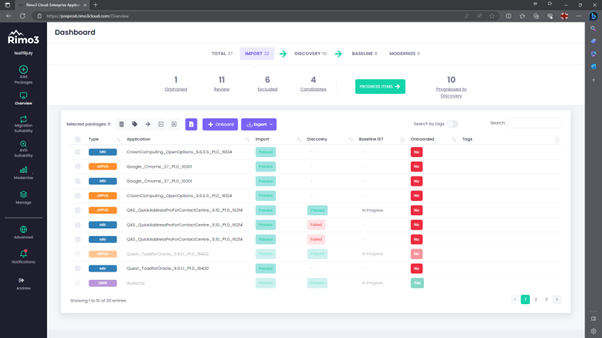
The Import tab lists all applications that have been imported into your tenant via upload, from SCCM, or by being manually added. The filters allow you to easily identify the current state of the imported apps and decide when to do with them next. The total number of applications in each filter will equal the number of applications displayed on the Import tab.
- Orphaned – Orphaned applications are applications that have been manually added but are missing the package source files, typically due to an upload issue. Source files will need to be reuploaded before the application can be progressed.
- Review – Applications are typically put into review when it is not clear if the imported package files represent one, or multiple applications. Additionally, the MSI that is created by the AppV Sequencer is always put into review and only the AppV package itself is imported. Applications that are in review will need to be approved before they can be progressed further.
- Excluded – When an application that has been imported does not need to be included in any testing, but you don’t want to lose record of the fact that it was imported, it can be excluded. Excluded application will not appear on any tabs other than Total and Import. On these tabs they will appear muted to differentiate them from other apps. Excluded apps will however be included in the Onboarding Report.
- Candidates – Applications that have been successfully imported and are not excluded are considered as candidates to be progressed. Once a candidate has been progressed to a subsequent stage it is not no longer considered a candidate and can be further managed from the appropriate tab.
- Progressed to Discovery – When an imported application is progressed the next stage is to Discover it; this filter lists all the applications that have been progressed to at least the Discovery stage and matches the initial filter for the Discovery tab.
The Discovery tab#
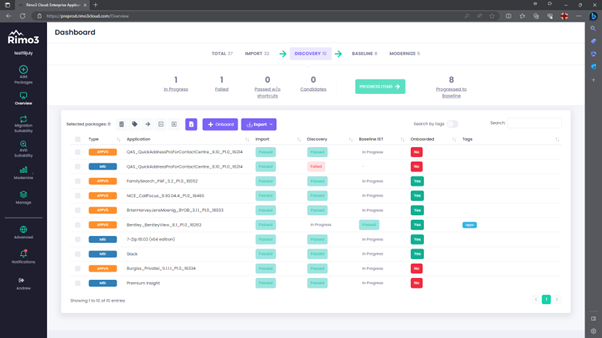
The Discovery tab list all applications for which a Discovery sequence was started, irrespective of the result of the sequence. The filters on this tab help you understand which applications successfully completed Discovery and which need further attention before they can be progressed. The total number of applications in each filter will equal the number of applications displayed on the Discover tab.
- In Progress – While an application is queued for Discovery or in the process of being Discovered its state will be In Progress. As each application completes Discovery it will move into one of the other filters.
- Failed – If an application fails to be Discovered, typically because it returned an error when being installed, it will be listed in the Failed filter. You can review failed applications and take the necessary steps to address the reported errors so that they are suitable to be progressed.
- Passed w/o shortcuts – Applications that install successfully but don’t install shortcuts than can be automatically detected cannot be progressed. You have the option to remediate the package by providing alternate source files or install switches that will install shortcuts, or you can manually selected executables to be tested.
- Candidates – when an application is discovered and one or more shortcuts are automatically detected, or have been manually selected, the package is considered a candidate to be progressed. Once a candidate has been progressed to a subsequent stage it is not no longer considered a candidate and can be further managed from the appropriate tab. • Progressed to Baseline – When an imported application is progressed the next stage is to Baseline it; this filter lists all the applications that have been progressed to at least the Baseline stage and matches the initial filter for the Baseline tab
The Baseline Tab#
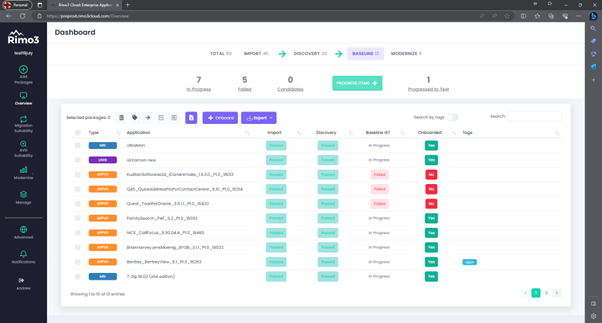
The Baseline tab list all applications for which a Baseline sequence was started, irrespective of the result of the sequence. The filters on this tab help you understand which applications have been successfully Baselined and which need further attention before they can be progressed. The total number of applications in each filter will equal the number of applications displayed on the Baseline tab.
- In Progress – While an application is queued for Baseline or in the process of being Baselined its state will be In Progress. As each application completes Discovery it will move into one of the other filters.
- Failed – If the Baseline IST fails for an application, it will be listed in the Failed filter. You can review failed applications and take the necessary steps to address the reported errors so that they are suitable to be progressed.
- Candidates – when an application is Baselined and all shortcuts are successfully tested, the package is considered a candidate to be progressed. Once a candidate has been progressed to a subsequent stage it is not no longer considered a candidate and can be further managed from the appropriate tab.
- Progressed to Test – When an imported application is progressed the next stage is to test it; this filter lists all the applications that have been progressed to Testing. The results of testing can be viewed and analysed on the AVD Suitability, Migration Suitability and Manage Dashboards as appropriate.
The Modernize Tab#
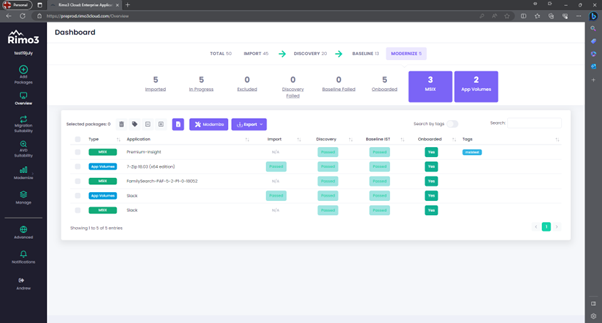
Modernization is another way of onboarding new packages to the Rimo3 Platform. When an existing package in your tenant is Modernized a new MSIX and/or App Volumes package is created and added to the platform. The filter on this tab help you understand the which applications have been successfully Modernized, Discovered and Baselined. The total number of applications in each filter will equal the number of applications displayed on the Modernize tab. Additionally, the MSIX and App Volumes buttons will indicate how many of the packages have been Modernized into each format. Clicking on these buttons will take you to the appropriate Modernization dashboard where the conversion and test results can be viewed and analysed in more detail.
- Imported – After an application is modernized the new package is created is imported to create a new record in your tenant. The import filter displays all modernized packages that have been imported.
note
Because of the way MSIX packages are automatically added to the platform they do not currently have a dedicated import sequence and so appear as N/A under the Import column.
- In Progress – this filter will list all the modernized apps that are currently being Discovered or Baselined. You can determine from the Discovery and Baseline IST columns which of these activities are in progress.
- Excluded - When an application that has been Modernized does not need to be included in any testing, but you don’t want to lose record of the fact that it was Modernized, it can be excluded. Excluded application will not appear on any tabs other than Total and Modernize. On these tabs they will appear muted to differentiate them from other apps. Excluded apps will however be included in the Onboarding Report.
- Discovery Failed – If a modernized app fails Discovery it will be listed in this filter, depending on the reason for the failure you can start a sequence to rediscover the application and attempt to complete the onboarding process.
- Baseline Failed - If a modernized app fails the Baseline IST it will be listed in this filter, depending on the reason for the failure you can start a sequence to rebase the application and attempt to complete the onboarding process.
- Onboarded – Modernized applications that have been successfully Discovered and passed the Baseline IST will appear in this filter. These packages, once onboarded, will be automatically tested against the Target and AVD Operating Systems.
Action Buttons#
On each tab there are various actions that can be performed on packages, these actions are:
 Progress selected applications to a subsequent stage of the onboarding pipeline, see Progressing selected applications below for more details.
note
This button is not available when the Review filter is applied, see Approve and progress button below.
Approve and progress selected application in the Review filter to a subsequent stage of the onboarding pipeline. This button is only available when the Review filter is applied, see Approving Packages in Review below for further details.
 Delete selected packages. The selected packages are soft deleted and no longer appear on any dashboards or in any reports. Deleted packages can be recovered or permanently deleted from the Recovery page on the Advanced menu.
 Tag selected packages. Tags can be added to and removed from the selected packages.

 Exclude/Include packages. Excluded packages cannot be progressed through the Onboarding pipeline or tested and won’t appear on any other dashboards or reports. Excluded packages will appear on the Total, Import and Modernize tabs and in the Onboarding Report. Excluded packages can be tagged, e.g, to give a reason as to why they were excluded. To bring Excluded packages back into scope select the packages and click on the include button, the package will then be returned to the state it was when it was excluded.
 Download the Onbaording report in Excel format for all Imported and Modernized applications.
Progressing applications#
There are 4 options available for progressing applications from one stage to the next, you can automatically progress all applications that are suitable to be progressed or you can choose which applications you want to progress.
Progressing all applications that are suitable to be progressed#
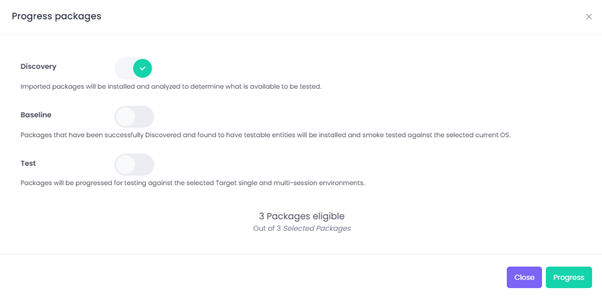
To automatically progress all applications at a specific stage that are candidates for progression click on the Progress Items -> button:

This will automatically select the appropriate applications and open the Progress packages dialog box. You will see that the next stage is automatically selected, and you can additionally choose if you which the packages to automatically progressed further, if they complete the subsequent stages successfully.
Progressing selected packages#
If you wish to only progress specific packages you can do this by selecting the checkbox next to the appropriate packages and selecting the Progress Items button in the header of the results table:

This will also open the Progress packages dialog box with the next stage selected by default. You will notice however that when selecting packages to progress not all of them my be suitable therefore you should pay attention to the number of eligible packages as detailed at the bottom of the dialog box
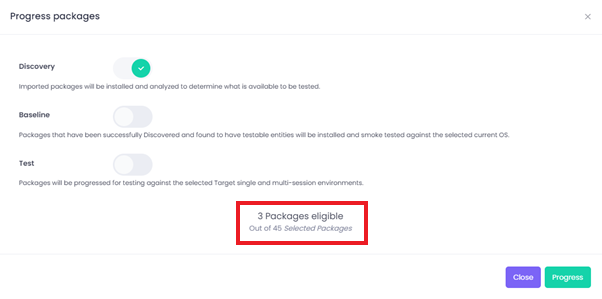
In the example above 45 packages were selected but not all of them can be progressed, this could be for several reasons such as:
- They are excluded, orphaned or in review
- They have been progressed to the next stage already, this prevents packages from accidently being rediscovered or rebased.
- They don’t have shortcuts to test, or they have failed the Baseline IST
info
To avoid confusion as to which application will be eligible when selecting the applications you want to progress you can first apply the Candidates filter, then select which applications to progress from the filtered list. All applications in the Candidates filter will be eligible for progression.
Approving Packages in Review#
Under certain circumstances it may not be possible to import an uploaded package and such packages will go into Review so they can be assessed before deciding what to do with them. Uploaded packages will go into review for the following reasons:
- The MSI produced by the AppV Sequencer and uploaded with an AppV package will always go into review.
- When multiple MSI packages are uploaded in the same folder all the MSI’s will go into review
When a package is in Review you can do one of three things:
- Do nothing and leave it in review. Packages that are in review cannot be progressed and will not appear on any dashboards or reports outside of the Onboarding Dashboard and Onboarding Report.
- Delete the package. Deleted packages will not appear on any dashboards or in any reports. Deleted Items can be recovered or permanently deleted from the Recovery page on the Advanced menu.
- Approve and progress the package. When the Review filter is applied on the Import tab the Progress button is replaced by the Approve and Progress button.

When you click on the Approve and Progress button:
- You will be prompted to approve the selected packages.
- If you click on Yes, proceed the selected packages will be immediately approved and no longer appear in the Review filter.
- The Progress dialog will then open, and the selected packages can then be progressed as desired.
- If you close the Progress dialog the selected applications will still have been approved but will no longer be visible in the Review filter, they will instead appear in the Candidates filter.
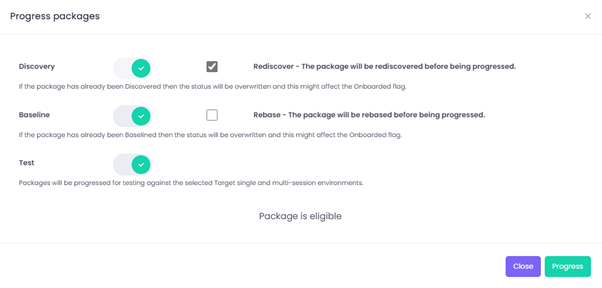
Rediscovering and Rebasing packages#
After applications have been Discovered or Baselined there may be a need to Rediscover or Rebase them, especially in the case of a failed Discovery or Baseline or provisioning errors unrelated to the behaviour of applications. However, in order to prevent accidental rediscovery or rebase, applications that have previously been Discovered or Baselined will not be eligible for these stages unless you explicitly choose to rediscover or rebase them.
In the example below 20 applications were selected on the Discovery tab but only 3 can be progressed to Baseline because the other 17 applications have been previously discovered.
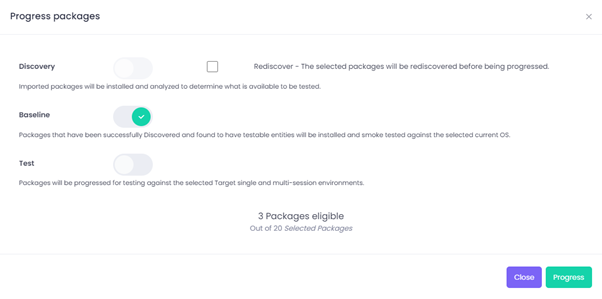
However, when selecting the Rediscover checkbox Discovery can then be performed against all selected packages, including those previously discovered, and therefore all packages are eligible to be progressed as selected.
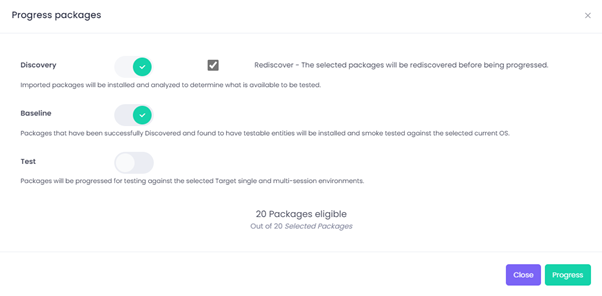
The behaviour is the same when progressing applications on the Baseline tab.
warning
Rediscovering and Rebasing packages will reset their onboarding status until such time as they successfully complete a Baseline IST against the configured Current OS.
Progressing individual applications#
On the Package Details screen there are no longer buttons for Rediscover or Rebase; these have been replaced by a Progress button that allows the individual package to be progressed as desired.

Depending on the current state of the package you will have the option to Discover, Baseline and Test the package. If the application has already been discovered or baselined previously you will need to explicitly select the Rediscover or Rebase checkboxes to avoid accidently resetting the discovery or onboarding status of the application.
Known Issues#
Packages that were identified as duplicates when originally imported were not displayed on the old Review page#
Issue - Previously, when imported packages were identified as duplicates a bug in how packages were identified meant that the duplicate packages were not displayed on the Review screen. These packages will now appear when the Review filter is applied and so you may see a higher number of imported packages in your tenant.
Workaround - As these duplicate packages were previously not visible they would not have been onboarded or tested so this does not represent a loss in data. These packages can be tagged as duplicates and either left in Review or excluded. Deleting the duplicate package is not recommended as there is a small chance that both the original and duplicate package could be deleted, especially in the case of uploaded packages.