Facilitated UAT (Private Preview)
Introduction#
The Facilitated UAT feature of Rimo3 Cloud enables users to provision a Task Runner virtual machine with an application pre-installed so that they can connect to the device and manually test the application.
The provisioning process will spin up a Task Runner virtual machine for either the Target or AVD environment, domain join the device if applicable, install any dependencies for the selected application before installing the application itself. Once the selected application has been successfully installed you will be sent an e-mail with details of the Task Runner virtual machine, including an RDP file which you can use to connect to the Task Runner. You will need to know the auto-login username and password as logging in as a different user is not currently supported.
info
Once this e-mail has been sent you will have 15mins to start the UAT otherwise the Task Runner will be deprovisioned.
Once logged in you will be able to start the UAT session. During the UAT you can make notes and take screenshots in the Facilitated UAT desktop application that will be running on the Task Runner, and the video of the test will bea video is automatically\ captured for audit trail purposes. At the end of the UAT the useryou can mark the test as passed or failed and provide a final note/summary of the UAT result.
info
Once you start the UAT you will have 2hrs to complete the UAT otherwise the Task Runner will be automatically deprovisioned.
Once the UAT is complete the Task Runner will be automatically deprovisioned.
Checking if you have access to the Private Preview#
In your tenant open the package details screen for any application and look for a Manual UAT button.

If you cannot see a button you will need to request access to the Private Preview for your tenant, you can either contact your account manager or send an e-mail to technicalsupport@rimo3.com to request access.
note
The button may be disabled depending on the state of the application you selected, but if you can see the button you have access to the Private Preview.
Starting a Facilitated UAT sequence#
Currently only one application can be selected at a time for testing in a Manual UAT session, this application and it's dependencies will be installed in the provisioned environment. Facilitated UAT can be started via the UI or via API.
Starting a Facilitated UAT via the UI#
To start a Facilitated UAT session via the uI do the following:
- Browse to the package details screen of the application you want to test.
- Click on the Manual UAT button
- In the wizard complete the following details:

- Testing environment – choose whether to test on the Target or AVD environment
- Create a Public IP address - By default a private IP address is created for all Task Runners. However, if you will not have access to the device via the private IP address you can create a public IP Address for remotely connecting to the Task Runner.
note
If assigned, the Private IP address will be deleted when the environment is deprovisioned.
- Additional Testers – You can specify a list of people to receive the connection details for the Task Runner once it is ready, the user triggering the Manual UAT should specify their e-mail address too if they want to be inculded in comms messages.
note
If multiple users need to test different scenarios they will need to connect in turn and complete they tests in the same UAT session, within the allotted 2hrs. These users will need to know the auto-login username and password to connect to the Task Runner.
- Click on Submit to start the provisioning process
- A Facilitated UAT sequence will be started and an e-mail will be sent to the email address(es) specified in the the Manual UAT Wizard.
- You can monitor the progress of provisioning the test environment and installing the application and any dependencies by selecting the Manual UAT sequence on the sequences screen
- Once the Task Runner has been provisioned and the application has been installed you will receive an email containing details of the environment and an RDP file which can be used to connect to the Task Runner.
warning
You will have 15 minutes to connect to the Task Runner and start the UAT session, otherwise the Task Runner will be automatically deprovisioned.
Starting a Facilitated UAT via the API#
You can start a Facilitated UAT session using the
POST/api/v2/application-packages/{applicationPackageId}/manual-uat API end point.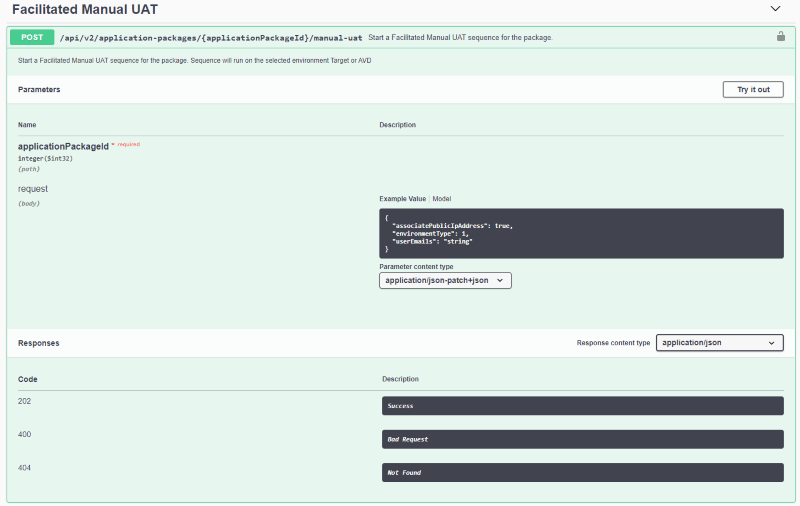
Full details of the API endpoint can be found in the Swagger documentation in your tenant.
Once the API endpoint has been successfully triggered a Facilitated UAT sequence will be started and an e-mail will be sent to the email address(es) specified in the the Manual UAT API request body.
You can monitor the progress of provisioning the test environment and installing the application and any dependencies by selecting the Manual UAT sequence on the sequences screen
Once the Task Runner has been provisioned and the application has been installed you will receive an email containing details of the environment and an RDP file which can be used to connect to the Task Runner.
warning
You will have 15 minutes to connect to the Task Runner and start the UAT session, otherwise the Task Runner will be automatically deprovisioned.
Connecting to the Task Runner and starting the test session#
When the Manual UAT Task Runner is ready for testing you will receive an e-mail with details of the test environment and an RDP file which you can use to connect to the environment.
warning
You will have 15 minutes to connect to the Task Runner and start the UAT session, otherwise the Task Runner will be automatically deprovisioned.
- Open the provided RDP file
info
You can use other tools and methods such as RDPMan or Bastion if they are available to you.
- To ensure video and screenshots are captured without cropping it is recommended that you use a resolution of 1024x768 for the RDP session
- When prompted enter the auto-login user’s credentials.
- Once you are connected you will be presented with the following screen. It will not be possible to do anything on the device until you have started the UAT session.
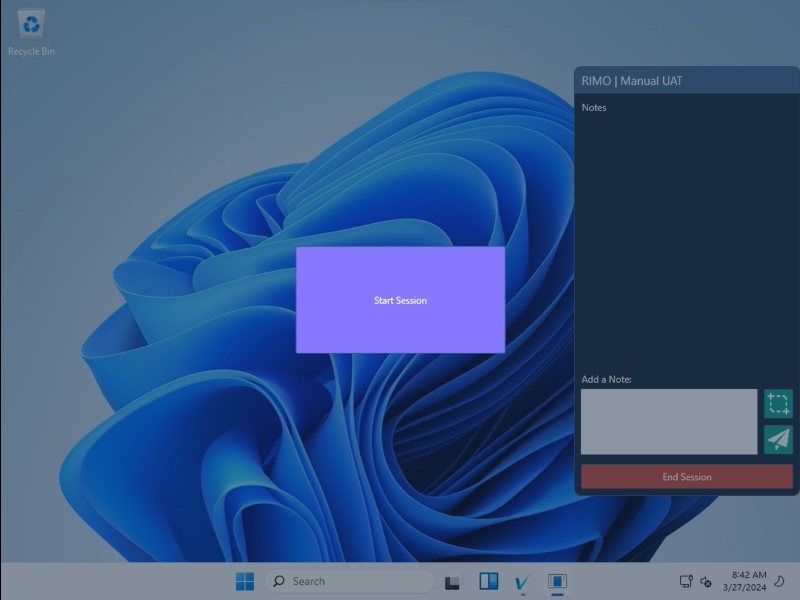
- Click on Start to begin the Manual UAT session
- You can now start testing the install application.
warning
You will have 2hrs to complete testing before the Task Runner is automatically deprovisioned.
Testing and completing the test session#
During the Manual UAT session you will be able to launch and test the install application as needed. As soon as the session starts video will automatically be captured, additionally you can do the following during the test session:
Take notes – using the Manual UAT desktop application you can enter notes as you carry out tests. These notes can be deleted during the test session.
Take screenshots – you can also capture screenshots using the Manual UAT desktop application. You can also add a note to the screenshot. Screenshots can be deleted during the test session.

Once testing is complete the session can be ended by clicking on the End Session button. You will then be prompted to mark the test and either Passed or Failed and you will have the opportunity to provide and final summary note for the test.
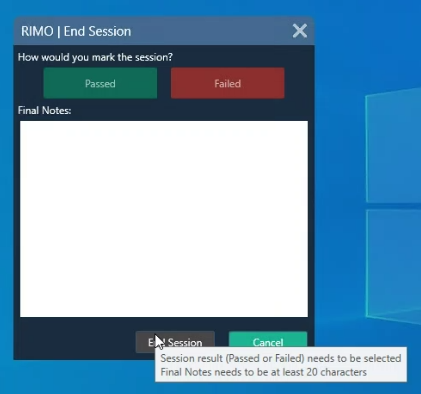
info
You must choose a result and enter at least 20 chars in the final summary note before you can submit the form.
After submitting the result the Task Runner will be automatically deprovisioned and the RDP session will be disconnected.
Viewing Results#
Once a Manual UAT is complete you can review the result in the following ways:
Manage Dashboard/Migration Suitability Dashboard
On the Manage and Migration Suitability Dashboards there will be an additional column called Manual UAT, this will show the result set in the final step of the Manual UAT. Clicking on the result will take you to the Manual UAT sequence where you can view more details about the UAT and watch the video that was captured.
note
If the manual UAT session times out becuase it is not started or completed in time there will be no result displayed for the application on the dashboard.
On the AVD Suitability Dashboards there will be an additional column called Manual UAT, this will show the result set in the final step of the Manual UAT. Clicking on the result will take you to the Manual UAT sequence where you can view more details about the UAT and watch the video that was captured.
note
If the manual UAT session times out becuase it is not started or completed in time there will be no result displayed for the application on the dashboard.
Sequence details page On the sequence details page you can review the following information from the Manual UAT:
- Console tab – on the console table you can see detail of provisioning the Manual UAT task Runner, installing the application and any dependencies, as well as any notes captured during the session.
- Video tab – on the video tab you can play back the video captured during the session
- Output tab – on the output tab you can view any screen shots captured during the Manual UAT as well as any notes that were attached to the screenshot.
Excel reports The Manual UAT result and final summary note will appear in the Excel reports downloaded from the Mange, Migration Suitability and AVD Suitability dashboards.